DX or FX? - Which sensor size is better for underwater photography?
(March 2011)
Introduction
A debate often ensues among underwater photographers over which image sensor format is more suitable for underwater photography – the small format (Nikon calls it DX) or the large "full-frame" format (Nikon has termed it FX). The FX (large) format offers numerous advantages for general photography and is widely considered to be the "professional" format. Its two main benefits are a higher quality of image in unfavourable light conditions (when using high ISO sensitivity settings) and the "preservation" of lens’ angle of view. The word "preservation" is deliberately written in quotes, considering the association between the focal length and the field of view is only imagined in our minds, where it has been impressed during the age of 35 mm film. Upon the emergence of first commercially available digital SLR cameras, the small size of the sensor certainly posed a problem for wide-angle photography, as it made the lenses "lose" their wide angle. By now, this problem has been solved well and there are many wide-angle lenses for small sensors available on the market.
I have to agree that the benefits of FX format really outweigh the DX format and use it today almost exclusively for my land photography. On the other hand, I was convinced from the very beginning (since my transition from film to digital technology in 2006) that the DX (small) format is more suitable for underwater photography than the FX format. I have debated this time and again with my colleagues and tried to prove it (more or less unsuccessfully) on the basis of theoretical facts. Then I finally came to a decision to attempt to prove my claims with a practical test (or maybe realise that I was mistaken …). After all, my old D2x has by now become really obsolete and the results of this test will strongly influence my decision about its successor.

Underwater photography is fundamentally divided into two large fields – macro and wide angle, so I have conducted two separate sets of tests. Considering the macro photography, I am sure everyone will agree with me that the small format is the preferred choice over the large format. When taking pictures using the 1:1 reproduction ratio, the small sensor format namely provides a smaller crop of the nature, just as desired. Two additional phenomena must be taken into account in this respect: depth of field and reduced sharpness in the stopping down the aperture diaphragm due to light diffraction on the diaphragm blades. The first one speaks in favour of small format and the second one in the favour of large format. My practical test was designed to determine which of the two phenomena has a stronger effect.
I have devoted a lot more of my attention to wide-angle photography, the subject of most disagreements with my colleagues who advocate the FX format. My arguments were based primarily on the dome port theory, but I was unable to provide firm evidence, backed by experiments.
Equipment
Conducting these tests, I was especially interested in how the size of the image sensor influences the quality of the image (mainly the sharpness!) created by various optical systems under water. The optical system means either a macro lens behind a flat port or a wide-angle lens behind a dome port (specifically a fisheye lens, used extensively in underwater ambient photography). For this reason I have deliberately chosen two cameras with different sensors and the same resolution (12 Mpix): Nikon D2x (DX or small format) and Nikon D3 (FX or "full-frame" format). If I used cameras with different resolutions (e.g. D2x and D3x), it would be much more difficult to evaluate the test results.
I used the AF-S Nikkor 105mm f/2.8 VR lens for macro photography on both systems because I was interested in the image quality obtained at 1:1 reproduction ratio (or close to it) and not in the difference between the angles of view, which is already known.

I used fisheye lenses (AF Nikkor 10.5mm f/2.8DX on the D2x and AF Nikkor 16mm f/2.8 on the D3) and wide-angle zoom lenses (AF-S Nikkor 10-24mm f/3.5-4.5DX on the D2x and AF-S Nikkor 16-35mm f/4 VR on the D3) for wide-angle photography. The lenses in both pairs of camera setups are comparable and feature very similar angles of view.


For the tests I used the appropriate Seacam underwater housings and, most importantly, I used the same dome ports for wide-angle photography. The size of the dome port is decisive for the image quality, so it is mandatory to use the same dome ports (having the same curvature radius) for equivalent tests. Lighting was provided by Seacam underwater flash units.

I tried to use as equivalent settings as possible on both cameras, similar to the ones I use in underwater photography (the settings on the old-generation Nikon D2s are unfortunately not the same as on the newer D3, but I am pretty sure I was able to come quite close with my selection of image parameters, especially the sharpening level).
The following settings were used:
| Nikon D2x | Nikon D3 | |
|---|---|---|
| Image quality | RAW + JPG Large Fine | RAW + JPG Large Fine |
| White balance | 5600 K | 5600 K |
| ISO | 100 | 200 |
| Image sharpening* | +1 | 5 |
| Color space | Adobe RGB | Adobe RGB |
| Color mode | III | Vivid |
*Image sharpening settings in the Nikon D2x are between -2 to +2, and 0 to 9 in the Nikon D3, wherein 9 yields stronger sharpening than +2, so the sharpening levels were approximately equivalent judging from my experience.
In Photoshop I only adjusted the levels of photographed images and did not do any sharpening or other modifications.

The following dome ports were used in the tests: a fisheye dome port, a small fisheye dome port and a modified Seacam "Superdome".
Three different dome ports were used in testing the wide-angle lenses:
The first one was a modified Seacam "Superdome". It was modified in such a way to slightly reduce the glass diameter, leaving the curvature radius unchanged. The quality of the dome port depends on the curvature radius and the diameter determines the maximum angle of view. Because the curvature radius has not been changed, the quality of my dome port is identical to the original Seacam "Superdome". The dome port was attached to the underwater housing using a combination of different extension rings in order to position the lens at an optimal distance to the dome port glass. I used a 45 mm wide extension ring for the 10-24mm f/3.5-4.5 lens and an 85 mm extension ring for the 16-35mm f/4 lens, which is physically considerably longer. The tests with this dome port and zoom lenses were conducted in a swimming pool only.
The second port was a Seacam "fisheye" dome port: a glass hemisphere with approximately 80 mm curvature radius (approx. 160 mm diameter) optimised for 180° fisheye lenses. To perform the tests in the sea simultaneously, I used two identical dome ports, each mounted on its own housing. This dome port was used to conduct tests in the swimming pool and in the sea. The third dome port was a small "fisheye" dome with 50 mm curvature radius (approx. 100 mm diameter), a piece of equipment that is lately becoming increasingly popular for extreme close-up wide-angle images. This dome port performs well with lenses that are able to focus very closely (e.g. 10.5mm f/2.8). However, the optical quality of images taken with this dome port is inferior compared to the ordinary large "fisheye" dome port due to the small curvature radius. The tests involving this dome port were conducted in a swimming pool.

Nikon D2x, AF Nikkor 10.5mm f/2.8DX and a small dome port. The egg of a small-spotted catshark was approximately 10 cm in size.
Chromatic aberration (CA)
Nikon D2x is an outdated older-generation camera and is unable to automatically remove the CA introduced by the lenses themselves or in combination with other optical elements (e.g. flat ports in underwater photography). To obtain a clean image without CA, we have to take the photos in the raw (NEF) format and then process them with a suitable program (the best choice here is the original Nikon Capture NX). All photos in JPG format obtained directly from Nikon D2x exhibit CA.
Nikon D3 as a new-generation camera automatically removes CA using the same algorithms as Capture NX (this function is now provided by all Nikon cameras, even the cheapest entry-level models). JPG photos from Nikon D3 therefore exhibit no CA and cannot be compared directly to JPG photos made by D2x. My goal was to squeeze the best possible quality from both systems. For this purpose, the image quality was set to RAW + JPG large fine on both cameras. After processing the RAW (NEF) photos with Capture NX, I have compared the images without CA. In some cases, I deliberately processed the images in such a way to leave the CA untouched (even on the D3 images!) and then compared the "raw" optical results.
Macro photography
The main and most obvious advantage of small (DX format) sensors compared to the large (FX format) sensors is their performance in macro photography. When taking pictures using a macro lens and 1:1 reproduction ratio, the DX sensor makes a 24x16 mm crop (or even a bit smaller!) in nature, while the FX sensor makes a 36x24 mm crop.
This feature is recently becoming especially important with the increasing popularity of so-called "super macro" photography. In the times of film, 1.4x teleconverters were used to provide magnification (yielding approximately a 26x17 mm crop, which is lower magnification as the crop made by a bare lens attached on a DX sensor camera!). However, the use of teleconverters reduced the general sharpness of the lens and reduced their speed for one full f-stop. This impaired the reliability of autofocus and made it substantially slower. The underwater macro photographers have therefore profited from the advent of DX image sensors, as we were once again able to use "bare" macro lenses (with better sharpness and quicker and more reliable autofocusing), with the function of an 1.5x teleconverter provided "for free".

Two major technical problems in macro photography are the depth of field and diffraction of light on the diaphragm blades. The depth of field is tiny as a result of the small reproduction ratio. In order to increase the depth of field, we have to stop the aperture down, in turn causing the problem of diffraction that reduces the image sharpness.
The depth of field depends only on the reproduction ratio and the f-stop value. In macro photography, it can be calculated using the following simplified formula:
DOF = 2 . k . f . (1/X + 1) . X^2
where:
DOF = depth of field
k = allowable circle of confusion (0.03 mm for FX format and 0.02 mm for DX format)*
f = f-stop
X = reproduction ratio
* The allowable circle of confusion for DX format is 1.5x smaller, because the photo must be printed 1.5x enlarged due to the sensor being 1.5x smaller.
If we take a photo so that the larger side measures 36 mm in nature, the reproduction ratio for the FX format sensor (36x24 mm) is 1:1 (X = 1). If we want to make the same picture using a DX sensor (approx. 24x16 mm) and the same lens, we have to move back to 1.5x the distance, and the reproduction ratio is 1:1.5 (X = 1.5). Using the same f-stop (e.g. f/22) and taking into account two different allowable circles of confusion in the formula, the depth of field is 2.64 mm for the FX format, and approximately 3.30 mm for the DX format (about 25% larger).
Unfortunately, stopping the aperture down in order to increase the depth of field we are limited by the diffraction of light on the aperture diaphragm blades. The diffraction appears at some limit f-stop value and then reduces the general sharpness and contrast of image in a practically linear manner. Very simplified, the limit f-stop value can be calculated by multiplying the pixel size (in mm) by 2000.
Let us look at our two test cameras (Nikon D2x and D3), both having 12 megapixels:
the pixel size in Nikon D2x (DX format) is 5.6 µm (0.056 mm), and in D3 (FX format) it is 8.4 μm (0.084 mm). The limit f-stop for the DX sensor in Nikon D2x is therefore 0.056x2000 = 11.2 or f/11, while the limit f-stop for the FX sensor in Nikon D3 is 0.084 x 2000 = 16.8 or f/16. This means that the images will start losing sharpness when the aperture is stopped down to more than f/11 on Nikon D2x and to more than f/16 on Nikon D3.
It must be emphasised once again that the diffraction depends on the pixel size and not on the sensor format. Considering both cameras have an approximately equal number of pixels, the pixels in Nikon D3 are bigger due to a bigger sensor. On the other hand, the pixels in Nikon D3x are approximately 40% smaller than in Nikon D3, making it 40% (about one f-stop) more sensitive to diffraction, and also very similar to Nikon D2x in this respect.
The optimum aperture values for macro photography would therefore be f/11 for Nikon D2x, f/16 for Nikon D3 and f/11 for Nikon D3x. In real life however, all these f-stops unfortunately offer too small a depth of field at 1:1 reproduction ratio, so we usually stop the aperture down for one or two further f-stops (thereby sacrificing the image sharpness!). I believe the best trade-off between depth of field and diffraction in real-life conditions is given by the f-stop values f/16 to f/22 for Nikon D2x and f/22 to f/32 for Nikon D3.
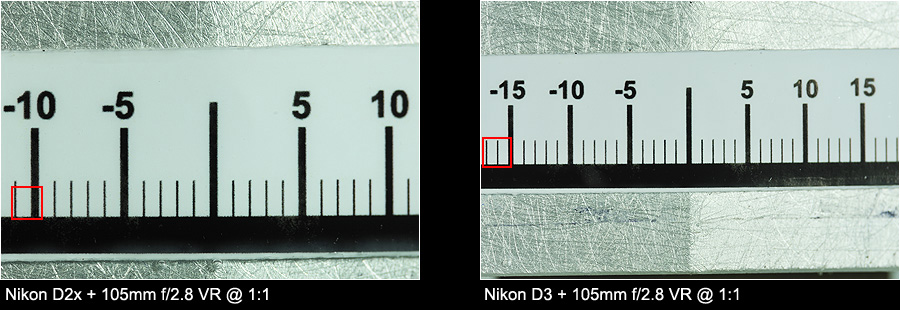
The macro images were tested using a special clipped aluminium block I have made in the time of film photography for tests and to find the optimal relation between the depth of field and diffraction. The block is mounted on a special carrier that can be attached to the housing in an arbitrary distance. This setup guarantees a constant distance and crop. A label with a millimetre scale is pasted to the block and the block surface is deliberately rough, so the sharpness or fuzziness of the photo can be easily identified. The right half of the block is clipped to an 11° angle and is designed for studying the depth of field. The tests were done in a swimming pool and the lighting was provided by two flash units. The photos were taken with f-stop values ranging from f/5.6 to f/45 in steps of 1. Shutter speed was 1/250 s to eliminate the influence of ambient light and the vibrations. The photos were taken using the 1:1 reproduction ratio with Nikon D3, and both the 1:1 and approximately 1:1.5 reproduction ratios with D2x, producing the same crop as with the D3.

Macro photography – results and discussion
As I have stated before, setting the 105mm macro lens to the shortest focusing distance produced an approximately 24 mm wide crop of the block with Nikon D2x and an approximately 36 mm wide crop with Nikon D3, corresponding to the actual width of their sensors.
I converted the images from raw NEF format to TIF format using the Capture NX program in two ways: deliberately leaving and deliberately removing the CA. I then compared the results to the direct JPG images from the camera. The sample photos (100% crops) are taken from the edge of the photo, where the effect of CA is the strongest. We can see the JPG image from D2x exhibits very strong CA, perfectly equal to the untouched NEF image. Fortunately, Capture NX is able to remove the CA to the very last trace. For this reason, I strongly recommend all owners of Nikon's older digital cameras to take their photos in NEF format and process them using the Capture NX program, which is able to quickly, automatically and successfully remove the CA.
Taking the photos with Nikon D3 is naturally a completely different story, but not one without a slight disappointment. The built-in algorithms for CA removal are apparently not as aggressive as the ones used in Capture NX. Namely, even considering that the extent of CA in D3’s JPG images is incomparable to D2x, traces of very weak CA can still be spotted. However, CA is so weak that it will not be noticed on most photographs, so the photos can be taken in JPG format with peace of mind. It seems Nikon D3 succeeds in removing CA originating from the lenses, but not all of the additional CA introduced when our photos are taken under water through a flat port.

I find a lot more important tests focused on the comparison between the depth of field and the problem of diffraction. In this test, the photos taken with Nikon D2x were made from 1.5x the distance as with Nikon D3, so I was able to obtain the same 36 mm crop. For the diffraction test, I selected a point to which I focused using the selected sensor. The sample 100% crops used to test the depth of field were taken from a point situated 15 mm right of the centre of image (and block), which is exactly 3 mm behind the focusing plane. I have taken the photos using f-stop values from f/5.6 to f/45 in steps of 1. I used autofocus (AF-S – single servo) with a single sensor selected (left to the central sensor). Each image was taken twice and the sharper of the two was selected.


Nikon D2x photos prove the sharpness remains practically unchanged until f/11, starts to deteriorate slightly at f/16 and then decreases linearly to f/45, where the image is completely useless. A similar decrease in sharpness is observed for Nikon D3, but shifted by approximately one f-stop: the images are equally sharp until f/16 and a hardly observable fuzziness occurs at f/22. The fuzziness at f/32 is very similar to the fuzziness observed with Nikon D2x at f/22. It is evident that the diffraction follows the simple formula stated above quite well in real-life circumstances.
The depth of field is somewhat more difficult to evaluate, but I think the real differences are significantly bigger as predicted by our previous theoretical calculations. Nikon D2x has a noticeably greater depth of field, observed especially with smaller f-stop values. Concluding from the test results, I may even ascertain its advantage is almost two f-stops. Naturally, this could also be a consequence of errors in focusing. One thing I have noticed is that the autofocus in Nikon D2x is somewhat less precise due to the size of its AF sensors, which are considerably larger than the sensors in D3. The depth of field increases linearly with aperture stopping down in both cameras, wherein the best sharpness with D2x is obtained at f/22. Stopping down even further, the effect of diffraction becomes so strong that it offsets any positive effect of a greater depth of field. The photo made with f/45 is noticeably fuzzier as the photo made with f/22. The photos taken with the D3 (having a smaller depth of field as well as diffraction) are consistently gaining on sharpness with smaller aperture, the best sharpness obtained right at f/45.
The conclusion of comparative macro tests is that the effects of depth of field and diffraction cancel each other out. The advantage of DX format over the FX format in the depth of field is lost due to diffraction. In order to get the same image sharpness with both cameras, the aperture must be stopped down by one further f-stop for FX format. However, all these statements are accurate only when both sensors have an approximately equal number of pixels! Using a camera with a greater number of pixels (e.g. D3x) puts us at a loss: the FX format means a reduced depth of field, and the smaller pixels amplify the problem of diffraction…
Without a doubt, I can stress once more the significant advantage of DX format over FX format in macro photography is, when the photographer wishes to make as small a crop of nature as possible ("super macro" photography).

Nikon D2x + AF-S Nikkor 105mm f/2.8VR – "super macro" portrait of a 3 cm nudibranch. It would be much harder to make such a photo with FX format.
Wide-angle photography
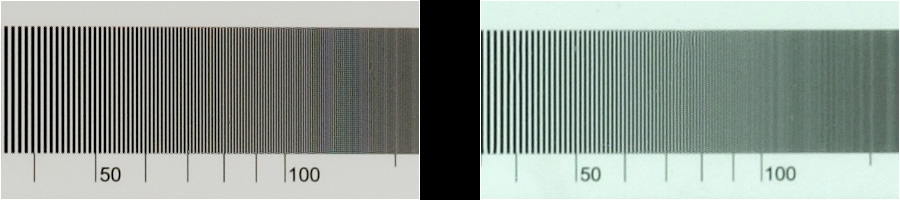
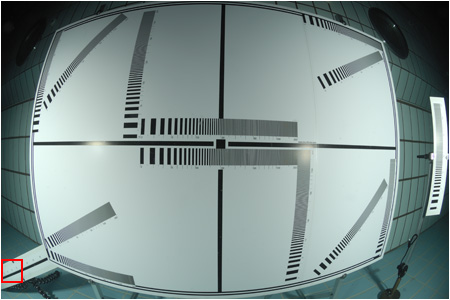
All wide-angle lenses were tested on land and under water in a swimming pool and using a test chart. I have also tested the fisheye lenses in "real-life conditions" in the sea. The test chart was a 120 x 80 cm test image, mounted on a dibond plate. The plate was attached to an aluminium frame. The land and pool photos were taken with the camera housings attached to a stable tripod. I used two flash units for lighting (the land photos were taken using underwater Seacam flash units, too), using all f-stop values and 1/250s shutter speed to eliminate the influence of ambient light and any fuzziness due to the shaking of the camera. The Seacam flash units provide a very wide range of flash intensities, so I was able to achieve optimal illuminations at all f-stops.

There is no quantitative meaning to the numbers on the test chart and they only serve for the relative comparison of sharpness – the same number means the same sharpness. In rare cases, the lines on the test chart have blended to greyness through the colour moiré effect. This means that the lens sharpness has exceeded the resolution of the image sensor, which consequentially misinterpreted the lens image. But in most cases the lines have blended well to a uniform greyness, meaning the image sensor resolution has exceeded the resolution of the optical system.
My test is completely unscientific and is based on the subjective assessment of sharpness. Closely observing the images on a large 24'' monitor (1920 x 1200 resolution) under 100% magnification, I tried to determine the value where the lines blended to a whole. Although my evaluation was subjective, I believe the deviations of my assessments never exceeded +/- 10%. When I entered the results into an Excel spreadsheet and created the charts, I was pleasantly surprised to see the curves were very nice and clearly trending according to the theory and pure logic. In other words: if I determined the system A to be sharper than system B under certain conditions, the difference can be a bit smaller or a bit bigger, but in each case I am convinced that A is better than B.
Dome port theory
Dome ports are the most common correction system used in underwater wide-angle photography. The dome port is defined by two spherical surfaces (outer and inner) having an identical centre of curvature (centre of sphere) and therefore forming a concentric dome. The difference of curvature radiuses of both surfaces equals the dome port thickness, which must be completely uniform.
The basic operating principle of a dome port is bringing the light rays into the lens in such a way that there is no refraction on the water-glass-air boundaries. This removes all CA, distortions and magnifications as the main optic problems occurring when the photos are taken from behind a flat port. This is only possible if the rays are entering the glass (almost) perpendicularly. Since all lines going through the centre of a sphere intersect the spherical surface at the right angle, the basic conditions for the successful correction with a dome port are placing the lens exactly in the centre of the sphere and perfectly aligning the lens' optical axis with the dome's optical axis. The light rays enter the glass approximately perpendicularly and therefore do not refract, retaining the lens angle of view.
Consequentially, only zoom lenses that don't change its physical size significantly while zooming are suitable for photography with a dome port. Among the Nikon FX lenses, the 16-35mm f/4 is much more suitable than the "legendary" 14-24mm f/2.8, the latter changing the position of its front optical element strongly while zooming.

All that being said, it is clear that one single dome port cannot be used with several different lenses. Each lens requires very accurate positioning that depends mainly on its physical length. In practice, one dome port and several extension rings can be used to adapt the distance between the dome port and the lens.
Although it succeeds well in removing the aberrations of a flat port, mainly the chromatic aberration, angle of view and distortions, a dome port introduces its own aberrations. A dome port is namely not an afocal system and this leads to two new fundamental dome port aberrations: changed field of focus and curvature of the field.
Changed field of focus

The lens field of focus changes due to the focal properties of the dome port. The dome port and water form together a highly negative lens and the smaller the curvature radius of the dome port, the stronger the diopter of the lens. Objects observed through a dome port appear much closer than they really are. A subject at infinity appears to lie in the far focal point of the dome port. The smaller the curvature radius of the dome port, the closer its far focal point and the closer the image of an object at infinity.
The virtual image of an object closer than infinity lies between the far focal point of the dome port and the dome port itself. The image of the object therefore does not lie in its focal plane, as when photographed in the air, instead it lies behind this plane - leading to a changed field of focus. The difference between both focuses is given very approximately by the following formula:
D = F^2 / R . (n - 1)
where:
D is the difference between both focuses
F is the focal length of the lens
R is the radius of the outer surface of the dome port
n is the index of refraction of water (approximately 1.33)
The results for the difference in focuses for both tested fisheye lenses and both fisheye dome ports (all values in millimetres) are provided in the table:
| Equipment | F | R | D |
|---|---|---|---|
| 10.5 mm f/2.8 + big dome | 10.5 | 80 | 0.45 |
| 10.5 mm f/2.8 + small dome | 10.5 | 50 | 50 |
| 16 mm f/2.8 + big dome | 16 | 80 | 1.06 |
| 6 mm f/2.8 + small dome | 16 | 50 | 1.69 |
It is evident from the table that the smaller dome port produces a larger change of focus. Furthermore, the lenses with longer focal lengths are more sensitive to the change of focus. The bigger the ratio between the radius of the dome port and the focal length of the lens, the better the optical quality of the image. According to the theory, the large dome port therefore has an advantage over the small dome and the AF Nikkor 10.5mm f/2.8DX lens has an advantage over AF Nikkor 16mm f/2.8. In the extreme case (16mm lens and small dome port), the change of focus is so big that the lens no longer compensates and the system is no longer able to focus! The 1.69 mm change of focus could only be compensated by a 16mm lens focusing to approximately 16 cm, but the smallest focusing distance of AF Nikkor 16mm f/2.8 is 25 cm.
Curvature of the field
In conventional land photography, the lens "sees" remote objects as if they were lying on a plane at "infinity". Taking photos of remote objects under water through a dome port, the lens "sees" them as if they were lying on the surface of a sphere, concentric with the curvature centre of the dome port, and not on a plane.
As we are therefore actually taking photos of virtual objects lying on a spherical surface, the image created by the lens will not be lying on a plane either. The image lies on a spherical surface, touching the focus plane of the lens in its vertex. The centre of image's spherical surface is positioned behind the image sensor, so in corners the effect of field curvature is added to the change of focus to additionally impair the results.


The field curvature phenomenon increases progressively (not linearly!) from the centre to the corners of the image, meaning the sensor size has a very important role. Herein lies the advantage of the smaller (DX) image sensor over "full-frame" (FX) sensors. Both errors can be alleviated to some extent by stopping the aperture down and thereby increasing the depth of field.


The field curvature is less serious when the curvature radius of dome port is large. As a rule of thumb, both errors can be kept within the allowable limits if the dome port's curvature radius is 10 times larger than the focal length of the basic lens and if the dome port walls are thin.
Unfortunately, this requirement is technically infeasible because such dome ports would be too big, clumsy to use and expensive to manufacture. A dome port with a curvature radius 5 times larger than the focal length of the basic lens can be considered pretty good (and large). In real-life photography, better results are obtained using lenses with short focal lengths that come closer to fulfilling these requirements - mainly the fisheye lenses.
Wide-angle zoom lenses – results and discussion
I tested the wide-angle zoom lenses (DX 12-24mm and FX 16-35mm) only in the swimming pool, using the large dome port (Seacam Superdome) and corresponding extension rings. I have then compared the sharpness of land photos with the photos made under water. The sharpness was measured in the centre of the image and in a point close to the far corner for both extreme focal lengths.

The 10-24mm f/3.5-4.5DX lens at 10mm exhibited a good underwater sharpness in the centre compared to the sharpness of the land image. It was quite sharp even when the aperture was open, and the sharpness increased up to f/11 when it started to deteriorate due to diffraction. The sharpness in the far corner was noticeably lower than the land image sharpness. The sharpness with open aperture was quite low and has increased with aperture stopping down in an approximately linear fashion up to f/11, where it started to gradually fall. The optimal aperture for this lens combined with the Superdome at 10mm is f/11.
The situation for 24mm is very similar, only the central sharpness is somewhat higher even with the aperture open. The sharpness increases very slowly up to f/11 and then starts to decline due to diffraction. A very similar situation to 10mm in the far corner is obtained with 24mm, but with slightly larger values (better sharpness). f/11 is therefore the optimal aperture for 24mm, too.


The 16-35mm f/4 VR lens at 16 mm exhibited a significant reduction of sharpness in the centre compared to the land sharpness. The centre sharpness has increased very slowly, reached the peak at f/11 and then started to slowly decline. The sharpness in the corner was consistently increasing during aperture closing down and was significantly lower than the 10-24 sharpness at 10mm. The optimal aperture for 16-35 at 16 mm is somewhere between f/11 and f/22.
At 35mm focal length, the situation in the centre is very similar to 16mm, the sharpness peaking at f/16. Even at 35 mm, the sharpness in the corner was consistently increasing with the aperture stopping down, the actual values exceeding those measured for 16mm. The optimum f-stop value for the 16-35 lens at 35mm is f/16.


Comparing the performance of both lenses under water, we can see the 10-24mm f/3.5-4.5DX outperforms the 16-35mm f/4 VR for both extreme focal lengths, both in the centre and in the corners, as well as for all f-stop values up to including f/11 (at the short end, both lenses with open apertures produce equally bad images in the corners). Both lenses perform approximately equally at f/22 in the short end, and at f/16 at the long end. At f/22, the 16-35 lens manages to slightly surpass the 10-24 (due to stronger diffraction on a smaller sensor).


The results lead to the following conclusions:
The 10-24mm f/3.5-4.5DX lens combined with a dome port is optically better than 16-35mm f/4 VR in nearly all parameters, consistent with the theory of dome ports. Both lenses exhibit a persistent increase of sharpness as the aperture is stopped down, as well as a decrease in the sharpness for the largest f-stop values as a result of diffraction.
The optimum aperture values are f/11 for 10-24 and f/16 for 16-35.
Fisheye lenses – results and discussion
I have devoted a lot more attention to fisheye lenses than to zoom lenses because I use them a lot more often under water. As in the macro photography tests, I began by testing the difference in CA for fisheye lenses. The work was done in a swimming pool (using a large fisheye dome) and I must emphasise at this point that taking photos from behind a dome port (with the lens positioned correctly) introduces no additional CA, as it is the case with taking photos through a flat port. All CA originates from the lenses themselves and is completely equal on land and under water. I was surprised to discover that the newer 10.5mm f/2.8DX fisheye lens is burdened with substantially more CA than the much older 16mm f/2.8! The old lens was designed deeply in the era of film, when the images recorded on film could not be corrected. But the new lens is a child of the digital era and its designers obviously just didn't bother to fiddle with CA, considering it can be removed quite easily with a suitable software application…

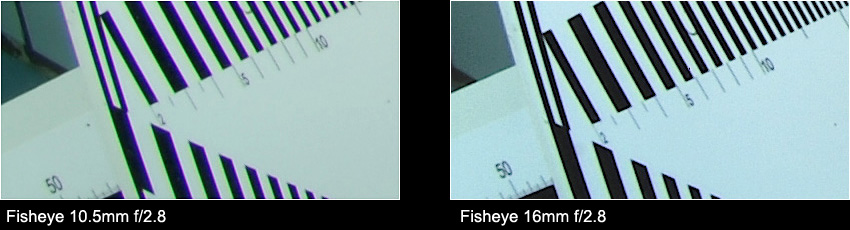

Making an objective evaluation of results obtained with fisheye lenses, having an almost 180° diagonal angle of view and heavy barrel distortion, was much more difficult. In addition, the ratio between the horizontal and vertical angles of view for fisheye lenses is not 1.5 as with all linear lenses, instead it is larger. This is why I used an additional test element with lines, placed to the right of the test chart, parallel to its vertical edge and at a distance that put the test element at the edge of images made with a fisheye lens. The sharpness was evaluated in the centre of the test chart and on the additional element, situated at the far right edge of the image.
Testing both lenses on land I have also noticed that the sharpness of the older 16mm f/2.8 lens does not lag significantly behind its "younger brother", contrary to the reports on its optical obsolescence often found on the web. The major disadvantage of the old lens for an underwater photographer is its inability to focus closer than 25 cm to the sensor plane. The new 10.5mm lens is able to focus to 14 cm from the sensor plane, meaning as little as 4 cm from the front lens element. This makes it suitable for extreme close-up ultra-wide-angle images, which are lately becoming increasingly popular in underwater photography.

I tested both lenses in a swimming pool using the large and small fisheye ports. Using the small dome port on the old 16mm lens may be completely nonsensical, but I have nevertheless conducted the test if Nikon one day presents a new version of the lens, which is able to focus closer.
Consistent with the expectations and the dome port theory, the sharpness in the centre of the image obtained with the 10.5mm lens and the large dome is only slightly worse as the sharpness obtained on land. The small dome port produces even worse results. The sharpness in the centre of the image peaks at f/8 and f/11 for both dome ports. At f/16 and f/22, where the sharpness declines due to diffraction, the differences between underwater and land results are minimal.
A completely different situation emerges at the far edge of the photo. The sharpness obtained with both dome ports is significantly worse than land sharpness, although the latter is also far from impressive. The sharpness peaks at f/8 on land, at f/11 for the large dome port and at f/16 for the small dome. The sharpness is equal at f/22.
A general conclusion could be that the optimal f-stop value for a 10.5mm lens with a large dome port is f/11. The photos taken with the small dome port exhibit optimal sharpness at f/11 in the centre of the image and at f/16 at the edge. The sharpness of the image made with a small dome port at f/16 is more uniform, so I am favouring this aperture value.


The situation in the centre of the image made with the 16mm lens and the large dome port is similar to the 10.5mm image, but the sharpness is considerably lower. The sharpness in the centre of the image made with the large dome port slowly increases in relation to aperture closing down and peaks at f/16. The situation with the 16mm lens and the small dome port is completely different. The projection of objects at infinity made by the small dome port is so close that the lens is no longer able to focus (as discussed above in the section on dome port theory). I was only able to take the photos by switching to manual focusing. The images were never focused, but stopping the aperture down gradually made them sharper owing to the depth of field effect. The best sharpness was not obtained until f/22.
The situation at the edge of images made with the large dome port and the 16mm lens is similar to the results obtained at 10.5mm, but the images were once again noticeably fuzzier. The peak of sharpness occurs at f/16 and the sharpness is only slightly reduced at f/22. If a picture made with the small dome port is fuzzy in the centre, we can expect nothing but worse results at its edges. Even f/16 yields no satisfactory sharpness and a large jump in sharpness is observed only at f/22.
We may draw a general conclusion that the optimal aperture value for the 16mm lens and the large dome is f/16 – in the centre and at the edges. The small dome port is useless for the 16mm lens and a satisfactory sharpness is only possible at the extreme aperture f/22.


The only reasonable comparison of both lenses can be made by using the large dome port. In the centre of the image, the 10.5mm lens outperforms the 16mm convincingly for all f-stops from f/2.8 to f/11, where the sharpness reaches its peak. The sharpness of 10.5mm lens starts to decrease at f/16 due to diffraction, while the 16mm lens reaches its peak at f/16, meaning the sharpness of both lenses is equal at that setting. At f/22, the sharpness in the centre is equal for both lenses and somewhat worse than at f/16.
The situation at the edge corresponds to the situation in the centre, with a large gap in sharpness observed at f/11. Here is where the 10.5mm lens reaches its peak and the sharpness of the 16mm lens is lower by approximately a half. The 16mm lens gains heavily on sharpness at f/16, almost equalling the performance of 10.5mm. The 16mm lens even manages to surpass the 10.5mm lens at f/22, considering the latter is more prone to diffraction owing to the D2x's smaller pixels.


As discussed before, the optimum aperture value is f/11 for the 10.5mm lens and f/16 for the 16mm lens. Comparing the physical diameters of opening (focal length divided by the f-stop number), we can see that the diameter of the opening at optimal aperture is about 1 mm for both lenses. The 1 mm "pinhole" is obviously responsible for delivering the depth of field required to offset the dome port's optical aberrations (field curvature), so that the sharpness is acceptable from the centre of the image to the edges.
The evaluation of far corners is even more problematic for fisheye lenses, so I didn't find it sensible to measure the sharpness there. Instead of the element with test lines I used an element with a drawn scale (60 cm with 5 mm graduation) to assess the boundary between sharpness and fuzziness caused by the dome port. This scale could unfortunately not be used to evaluate the sharpness in real-life conditions, but it has served well to demonstrate sharpness and fuzziness.

The motivation behind the tests in the sea was to show the practical meaning of numerical values of sharpness, obtained by taking the photos of test charts in a swimming pool. Both fisheye lenses were tested in very real-life conditions – the tests were conducted in February in Piran, Slovenia, the water temperature was 9 °C and the maximum visibility was 5 m. I have chosen two different motifs of the seabed and took photos using both systems and all f-stop values. The first system consisted of Nikon D2x + 10.5 mm f/2.8DX fisheye lens + Seacam housing with a large fisheye port dome + two Seacam 150 flash units. The second system included Nikon D3 + 16 mm f/2.8 fisheye lens + Seacam housing with an identical fisheye dome port + two Seacam 250 flash units. I took two or three photos for each f-stop and picked the sharpest images. Problems with too strong ambient light were observed when the aperture opening was the largest at f/2.8 to f/5.6 (making the images more greenish), so I have lowered the ISO value to 100 on D3. For the two most stopped settings of aperture f/16 and f/22, I have raised the ISO value on the D2x to 200. The shutter speed was always 1/250s in order to eliminate the influence of fuzziness due to vibrations.
The sample images (100% crops) were taken at the longer edge of the image (closer to the centre, hence with maximum sharpness), at the shorter edge (far from the centre, hence with lower sharpness) and two times in the far corner (the worst sharpness). The edge crops show the 10.5mm lens having approximately one f-stop of advantage in sharpness over the 16mm lens. In the corner crops, the 10.5mm lens is leading the 16mm lens by almost two f-stops. This result is consistent with the curvature of field theory: if we press a flat rectangle (sensor) against a spherical surface (where the image is created) so that the centre of rectangle touches the sphere, the edges of the rectangle are closer to the spherical surface than its far corners. The smaller the sphere, the greater the difference of distances. This means that the smaller the dome port, the greater is the curvature of the field (smaller sphere) and the more difficult it is to obtain a sharp image in the far corners.


Finally, I have made a comparison between the JPG image obtained directly from the camera and the image converted from the NEF format in Capture NX. All crops originate from the corner of images taken with both lenses at f/16. The JPG image from Nikon D2x displays a quite strong CA, while the image processed in Capture NX exhibited no CA and was comparatively very sharp. Both images taken with Nikon D3 were practically identical, without CA, but noticeably fuzzier.

It must be noted that the sharpness from corner to corner is only required when the image includes a lot of details, e.g. when taking a photo of a coral reef and the corals can also be seen in the far corners of the image. But if the main subject is concentrated in the middle section of the image and there are no important details in the corners (e.g. a big fish on a blue background), we can afford less sharpness in the corners, because it will go unnoticed.

Conclusion
Which sensor format is therefore better for underwater photography? I believe most photographers will agree with me that it is the DX (small) format. The small sensor is undoubtedly more suitable for macro photography, because it makes it easier to take very small crops in nature. A larger depth of field of small sensors unfortunately proved to be no advantage, considering the stronger diffraction as a result of smaller pixels on small sensors. The diffraction cancels out the positive effect of depth of field for (excessively) stopped down apertures.
Considering the use of dome ports for wide-angle underwater photography, there were initially some doubts as to which sensor is more suitable. The theory and the results of practical tests have once again confirmed the advantage of the small sensor, where the dome port aberrations (changed focus and curvature of field) are less evident. We must also take into account a significant fact that only the small format sensor enables technically successful extreme close-up wide-angle images to be taken with a small dome port and fisheye lenses, which are capable of focusing very closely (AF Nikkor 10.5mm f/2.8DX and Tokina 10-17mm f/3.5-4.5, a lens that is also very popular among underwater photographers).
Until recently, the superior characteristics of large FX sensors for photography in bad lighting conditions (low noise at high ISO values) put them at a large advantage over the small sensors. The large sensors were popular mainly with underwater photographers who worked predominantly in bad lighting conditions, e.g. taking photos of shipwrecks in great depths. But the recent launch of Nikon D7000 changed everything… This "big" small Nikon has proved that it is possible to take satisfactory photos with small sensor even when it is getting dark.
Acknowledgments
For help in conducting the tests I would like to thank:
Compay Syncomp for making the test chart.
Gianni Pecchiar and Adriano Morettin (both underwater photographers from Trieste, Italy) for lending me additional Seacam equipment.
Igor Vrhovec (Norik sub) and Marjan Makuc (Sub net) for logistic help in conducting the tests in the swimming pool (Igor) and in the sea (Marjan).
Update (June 2014)
Considering all these facts, I was desperately waiting for the successor to the D300 (name it D400). We never saw the D400, but Nikon suddenly surprised us with the announcement of the D800.
The moment I read the specifications of the coming D800 on the internet, I knew that this camera would be an underwater photographer's dream come true; the camera I've always been waiting for. I always wanted the image sensor of the "small" Nikon D7000 in a more professional body with a better autofocus, and that's exactly what I got! The DX crop of the FX image sensor featured in the D800 includes almost exactly the same amount of pixels (15.3 MP) as the sensor of D7000, plus a bonus of additional 21 MP to full FX format! The body of the D800 is without a doubt much more professional than that of the D7000 and in addition to that it shares the same improved autofocus system as the D4, which is of utmost importance for an underwater photographer. It seems like the D800 is the new "ideal" camera for underwater photography, which has both the usable DX and FX format at the same time!
The Nikon D800 was my entry into the world of full-frame underwater photography, but believe it or not, I was initially shooting only macro in FX format. For wide-angle images, I still preferred the Nikon 10.5mm f/2.8 and Tokina 10-17mm f/3.5-4.5 cropped sensor fisheye lenses over Nikon's 16mm f / 2.8 fisheye. Sharper corners were more important for me, than 36 megapixels, which my D800 offered. However everything changed, when I converted Nikonos RS 13mm f/2.8 underwater fisheye lens to work on my D800 in a Seacam housing. Its superior optical performance outperformed DX fisheye lenses behind dome ports. From that moment on, I am a "full-time" "full-frame" underwater photographer!